Recently, these little roll-ups have been featured on commercials and in magazines as something all the cool kids are doing with crescent rolls, but we've been doing these for years. I guess that makes us some of the original cool kids, eh? LOL
Anyway, this is a super easy recipe for busy mornings- especially when you're trying to occupy the littles while you're cooking. I hope your family enjoys them as much as we do.
Happy Thanksgiving everyone! I hope you all have a safe and blessed holiday.
Original post from November 2014.
_____
For breakfast at our house on Thanksgiving morning, I always make Moon Bread. At least, that’s what the kiddos call them. Presumably, because they’re made with Crescent Rolls and they turn out in a crescent moon shape.
It all started one Thanksgiving morning when the boys were little and I was looking for a quick breakfast that they could eat without me worrying about them making too much of a mess while they were watching the Macy’s Thanksgiving Day parade when we had the whole family coming for Thanksgiving dinner. But I also wanted it to be kinda special.
My Mama used to do that when I was a kid. She’d make Monkey Bread every Christmas morning. She never made it any other day of the year except Christmas morning so that made it special. I usually do the same thing for my kiddos on Christmas morning. I make their favorite breakfasts on their birthdays and French Bread Casserole for New Year’s morning, etc, etc. But I didn’t have a special breakfast in mind for Thanksgiving morning.
I was up long before the kids that day and had everything prepared for the dishes I was going to make. I had some bacon fried for another recipe and saw a tube of crescent rolls in the crisper drawer when inspiration struck. I know my kids like crescent rolls and they like bacon so why not put them together? Then I thought, “Hey, I’ll scramble some eggs and throw some cheese in too…” and voila! A new breakfast favorite was born.
Now my kids regularly ask me to make these. This Thanksgiving, the first one without my mom, Daddy came over early and spent the whole day with us. He was here for breakfast and declared “Moon Bread” to be his new favorite. I hope your family likes it too.
_____
What you’ll need:
1 package of your favorite bacon
6-8 eggs
1 package of pre-sliced cheese, cut into thirds (see notes)
2 tubes of “Big and Buttery” crescent rolls (see notes)
Fry the bacon and break each fried slice in half- do not crumble. Slice each square of cheese into thirds and set aside. Scramble the eggs and set aside.
Unroll the crescent roll dough and separate according to the pre-scored lines on each roll. You should end up with 8* triangles.
On the big side of the triangle, place one rectangle of cheese, one teaspoon of scrambled egg, and one or two bacon halves. Fold the end up over top of the ingredients and then tuck each side underneath, towards you. Continue to turn the roll over until it comes to the point. Continue each triangle of dough until you use up all of the ingredients. If you run out of one, simply omit it from that roll and move on. Place each roll onto a cookie sheet and bake according to the crescent roll package directions.
Notes-
• These are best served hot, fresh out of the oven but you can make them a day ahead of time and warm them up.
• *Regular crescent rolls come with the dough pre-scored into 10 rolls. “Big and Buttery” crescent rolls come with the dough pre-scored into 8 rolls. I usually buy the Big and Buttery ones because that’s what my family prefers; however, this recipe turns out just as good using regular crescent rolls. Just use slightly less than a teaspoon of scrambled egg for each roll or they’ll burst open when you bake them.
• I prepare all of the ingredients the night before I plan to make these- including scrambling the eggs. Just put them into a Ziploc baggy and they’ll heat up nicely.
• Don’t crumble the bacon. Tear each cooked slice in half so that you end up with a piece about the length of your little finger. Use one or two per roll.
• I use Muenster cheese. It comes pre-sliced in a package of 10-12 slices. You can also use American or cheddar. And you can also slice thin pieces from a block of cheese.
• This recipe is very forgiving and is easily adaptable to your family’s individual preferences. Try making them using just bacon and cheese or just cheese; they’re delicious either way.
Showing posts with label Recipes. Show all posts
Showing posts with label Recipes. Show all posts
November 22, 2017

September 15, 2015
Pumpkin Spice Syrup - Take 2
Anyone who knows me at all knows that I love Pumpkin Spice anything. When asked what their favorite flavor is, most folks respond with, "vanilla", "chocolate", "mint", or the like. Not me! My response is always pumpkin spice. As a result, I'm always trying the latest pumpkin spice flavored something to come out.
Randomperson: "Would you like to try this cardboard?"
Me: "Beg your pardon??"
Randomperson: "It's pumpkin spice flavored."
Me: "Oh! Well why didn't you say that to begin with? Of course I'll try it!"
Yeah, I know. Sad, isn't it? LOL
I posted a recipe a while back for Pumpkin Spice syrup and it was my go-to recipe until recently when I decided to experiment a bit.
I needed a recipe for a larger quantity. The previous recipe only made enough for a couple of days and I rarely (see: never) shared.
Also, I wanted to try to make a syrup that was a little more "everybody friendly." Just because I like my PSL (that's Pumpkin Spice Latte for those who don't know) with cinnamon and bits of pumpkin floating in the bottom, not everyone does. As such, that recipe doesn't lend itself to many uses other than coffee.
This new one could be drizzled over pumpkin loaf or ice cream or the top of a cheesecake... oh, I could go on and on!
Suffice to say that while the old recipe is still delicious and is one I will make again some day, the following is so much better for so many reasons and is now my new favorite.
Thanks to my son, Christopher, and my dear friend, Rachel H., for being my guinea pigs!
Pumpkin Spice Syrup
6 cups white sugar
½ cup brown sugar
5 cups water
2 cinnamon sticks (see notes)
5 whole cloves (see notes)
½ tsp ground nutmeg
¼ tsp ground ginger
¼ tsp ground allspice
1 tsp vanilla
4 heaping tablespoons of canned pumpkin
cheesecloth (see notes)
Cut a small square of cheesecloth and place the ground spices and cloves in the center. Tie the cheesecloth to make a sachet.
In a heavy-bottomed pot, combine both sugars and water. Stir until dissolved. Add cinnamon sticks and spice sachet. Bring mixture to a full rolling boil and cook for five minutes, stirring occasionally.
Turn off the heat and allow to steep for at least thirty minutes. (longer, if desired)
In the meantime, prepare four pint-sized jars (see notes) with lids in a hot water bath to sterilize the jars. Once steeped, bring mixture back to a full boil and cook for another few minutes. Turn off heat and remove the cinnamon sticks and sachet. Whisk in pumpkin* and vanilla until smooth. (Please see note regarding adding pumpkin!)
Remove jars, one at a time, from the hot water bath. Fill jar, leaving ¼ in. head space in the top. Wipe the rim clean with a damp cloth and place lid and ring on top. Turn ring just tight enough to secure it. Allow to sit undisturbed until the lid seals (lightly press the middle of the lid- if it pops back up, it isn’t sealed yet) and then tighten lid the rest of the way. Enjoy!
Makes 4 pints with approximately ½ cup left over.
NOTES-
*DO NOT be tempted to add the pumpkin while the mix is still boiling. If you do, the pumpkin will coagulate and you’ll end up with goopy, slimy “syrup” with a consistency somewhat like thick egg whites. (Just trust me- you’ll be glad you did.)
I like to use cinnamon sticks and whole cloves because I keep them on hand for other recipes. You can use 1 tablespoon ground cinnamon and ¼ tsp ground cloves instead; just add them to the spice sachet before you tie it off.
Don’t let making the spice sachet scare you! It’s actually very easy to do. You can also use a fine-mesh tea ball instead of cheesecloth. The end result will be darker golden brown syrup but the taste will be the same.
Don’t skip the step where you allow the mixture to steep.
Some jams/preserves/jelly/etc recipes require further processing by putting the jars into a pot of boiling water for additional cook time- this recipe is not one of them. Once the jars are sealed, you're done.
Randomperson: "Would you like to try this cardboard?"
Me: "Beg your pardon??"
Randomperson: "It's pumpkin spice flavored."
Me: "Oh! Well why didn't you say that to begin with? Of course I'll try it!"
Yeah, I know. Sad, isn't it? LOL
I posted a recipe a while back for Pumpkin Spice syrup and it was my go-to recipe until recently when I decided to experiment a bit.
I needed a recipe for a larger quantity. The previous recipe only made enough for a couple of days and I rarely (see: never) shared.
Also, I wanted to try to make a syrup that was a little more "everybody friendly." Just because I like my PSL (that's Pumpkin Spice Latte for those who don't know) with cinnamon and bits of pumpkin floating in the bottom, not everyone does. As such, that recipe doesn't lend itself to many uses other than coffee.
This new one could be drizzled over pumpkin loaf or ice cream or the top of a cheesecake... oh, I could go on and on!
Suffice to say that while the old recipe is still delicious and is one I will make again some day, the following is so much better for so many reasons and is now my new favorite.
Thanks to my son, Christopher, and my dear friend, Rachel H., for being my guinea pigs!
Pumpkin Spice Syrup
6 cups white sugar
½ cup brown sugar
5 cups water
2 cinnamon sticks (see notes)
5 whole cloves (see notes)
½ tsp ground nutmeg
¼ tsp ground ginger
¼ tsp ground allspice
1 tsp vanilla
4 heaping tablespoons of canned pumpkin
cheesecloth (see notes)
Cut a small square of cheesecloth and place the ground spices and cloves in the center. Tie the cheesecloth to make a sachet.
In a heavy-bottomed pot, combine both sugars and water. Stir until dissolved. Add cinnamon sticks and spice sachet. Bring mixture to a full rolling boil and cook for five minutes, stirring occasionally.
Turn off the heat and allow to steep for at least thirty minutes. (longer, if desired)
In the meantime, prepare four pint-sized jars (see notes) with lids in a hot water bath to sterilize the jars. Once steeped, bring mixture back to a full boil and cook for another few minutes. Turn off heat and remove the cinnamon sticks and sachet. Whisk in pumpkin* and vanilla until smooth. (Please see note regarding adding pumpkin!)
Remove jars, one at a time, from the hot water bath. Fill jar, leaving ¼ in. head space in the top. Wipe the rim clean with a damp cloth and place lid and ring on top. Turn ring just tight enough to secure it. Allow to sit undisturbed until the lid seals (lightly press the middle of the lid- if it pops back up, it isn’t sealed yet) and then tighten lid the rest of the way. Enjoy!
Makes 4 pints with approximately ½ cup left over.
NOTES-
*DO NOT be tempted to add the pumpkin while the mix is still boiling. If you do, the pumpkin will coagulate and you’ll end up with goopy, slimy “syrup” with a consistency somewhat like thick egg whites. (Just trust me- you’ll be glad you did.)
I like to use cinnamon sticks and whole cloves because I keep them on hand for other recipes. You can use 1 tablespoon ground cinnamon and ¼ tsp ground cloves instead; just add them to the spice sachet before you tie it off.
Don’t let making the spice sachet scare you! It’s actually very easy to do. You can also use a fine-mesh tea ball instead of cheesecloth. The end result will be darker golden brown syrup but the taste will be the same.
Don’t skip the step where you allow the mixture to steep.
Some jams/preserves/jelly/etc recipes require further processing by putting the jars into a pot of boiling water for additional cook time- this recipe is not one of them. Once the jars are sealed, you're done.
September 7, 2015
Congo Squares
Congo Squares... my goodness, where do I even begin to describe Congo Squares? They're kinda like a blondie, but not. They're kinda like a brownie but not quite because you don't use cocoa powder. Let's see, the best way I can describe them is to say they're like the best chocolate chip cookie you've ever had except they're bars instead of cookies.
They are somewhat temperamental to make, though, so please read all of the notes before you start. If they turn out cakey or hard instead of chewy and gooey, you've done something wrong.
Brimming with buttery, chocolatey, gooey, brown sugary goodness, Congo Squares are scattered all over the pages of my childhood. I can't recall a family gathering where someone didn't make a pan of them. They're definitely a family favorite.
I honestly have no idea where the name came from. Actually, I'm not even sure where the recipe came from either but I do know that my great-grandmother used to make them frequently. No one in my family can recall a time when there was no such thing as Congo Squares.
Grandma Helen took them to church social events often. My Mama also made them. Oddly enough, I didn't make my first pan of Congo Squares until I became an adult and had been married for 10 years. I have no idea why, really, I just never tried before.
You know how sometimes someone will give you the recipe for something they've made but when you try to make it, no matter what you do, you can't duplicate their results? Well, that's how Congo Squares are. Try as you might, if you don't follow a couple of seemingly insignificant little details that mustn't be overlooked, your Congo Squares are never going to turn out right. So please try to follow the directions to the letter or they absolutely will not turn out.
I can't tell you how long they last because they've never made it past a day at our house. In fact, I made a pan this afternoon but didn't have time to take a picture to include in this post because the minute they cooled, they disappeared.
Yes, they're *that* good. Trust me on this one. :)
Congo Squares
2-3/4 cup all-purpose flour
2-1/2 t. baking powder
½ t. salt
2 sticks Parkay margarine (see notes)
1 pkg. (16 ozs) brown sugar
1 cup pecans, chopped
3 eggs
1 pkg. (12 ozs) semi-sweet chocolate chips (see notes)
Preheat oven to 350 degrees. Grease and flour two 7x11 cake pans or one 10x13 pan. (see notes)
Sift together dry ingredients, set aside. In a saucepan, melt margarine and brown sugar together. Add nuts and allow mixture to cool to room temperature.
After the butter mixture has cooled completely, add eggs, one at a time, mixing thoroughly between each egg. Pour mixture over dry ingredients and stir only enough to incorporate ingredients. Stir in chocolate chips and immediately pour into prepared pan. Bake for approximately 35 minutes or until a toothpick inserted into the middle comes out clean. Allow to cool for a few minutes and cut into squares while they’re still hot.
_____
*Please note- The recipe posted above is the original recipe. However, I have found that the following changes make mine turn out like they’re supposed to more consistently:
Use 2 eggs instead of 3
Reduce the flour to 2-1/4 cups instead of 2-3/4
NOTES-
As I said before, this recipe is somewhat temperamental to make. When done correctly, they turn out with a chewy brownie/blondie consistency with a crackled, glossy crust on top. When done incorrectly, they turn out cakey or hard and brittle. They're still tasty, they're just not as good as they'd be if they turn out correctly.
You *want* them to fall in the oven as they tend to be too cakey when they rise to the top of the pan. If they don’t fall on their own, shake the pan to help them fall.
Only use Parkay margarine (specifically); do not use real butter. The squares will stay soft and chewy once they cool if you use margarine due to the amount of vegetable oil/shortening used to make margarine. They’ll turn hard and somewhat brittle if you use real butter. My great-grandmother said to *only* use the Parkay brand of margarine.
I have found the following helps if you must use real butter in a pinch: add one tablespoon of shortening to the saucepan when you’re melting the butter and brown sugar mixture.
If you add the eggs to the butter and brown sugar mixture too soon, they’ll cook and cause the recipe to taste eggy. Try to let the mixture cool close to room temperature before you add the eggs.
The above ingredients are the original recipe. I usually omit the nuts and use 1/2 semi-sweet chocolate chips and 1/2 milk-chocolate chips.
This is optional but freezing the chocolate chips for at least 20 minutes before adding them to the recipe will keep them from completely melting in the oven. They'll still be melty and gooey, but freezing will help them keep their shape and prevent them from running into the batter.
Be sure to use all-purpose and not self-rising flour. Adding too much baking powder to self-rising flour will make the recipe turn out cakey and it will have a weird metallic/baking soda taste. If you must use self-rising flour, reduce the amount of baking powder to 1-1/4 teaspoons.
Using two 7x11 pans will make the squares turn out somewhat thinner.
Using one 10x13 pan will make the squares turn out thicker and a bit more dense than using two smaller pans. But if done correctly they will taste equally good.
You can use a 9x13 pan in a pinch but I have not yet been able to get mine to turn out using that size pan. They all end up too thick and/or running over the edge of the pan.
As with any recipe, using dark or coated pans will result in a medium brown crust; using an aluminum or enamel-coated pan will result in a light brown crust. However, the taste should be the same.
They are somewhat temperamental to make, though, so please read all of the notes before you start. If they turn out cakey or hard instead of chewy and gooey, you've done something wrong.
Brimming with buttery, chocolatey, gooey, brown sugary goodness, Congo Squares are scattered all over the pages of my childhood. I can't recall a family gathering where someone didn't make a pan of them. They're definitely a family favorite.
I honestly have no idea where the name came from. Actually, I'm not even sure where the recipe came from either but I do know that my great-grandmother used to make them frequently. No one in my family can recall a time when there was no such thing as Congo Squares.
Grandma Helen took them to church social events often. My Mama also made them. Oddly enough, I didn't make my first pan of Congo Squares until I became an adult and had been married for 10 years. I have no idea why, really, I just never tried before.
You know how sometimes someone will give you the recipe for something they've made but when you try to make it, no matter what you do, you can't duplicate their results? Well, that's how Congo Squares are. Try as you might, if you don't follow a couple of seemingly insignificant little details that mustn't be overlooked, your Congo Squares are never going to turn out right. So please try to follow the directions to the letter or they absolutely will not turn out.
I can't tell you how long they last because they've never made it past a day at our house. In fact, I made a pan this afternoon but didn't have time to take a picture to include in this post because the minute they cooled, they disappeared.
Yes, they're *that* good. Trust me on this one. :)
Congo Squares
2-3/4 cup all-purpose flour
2-1/2 t. baking powder
½ t. salt
2 sticks Parkay margarine (see notes)
1 pkg. (16 ozs) brown sugar
1 cup pecans, chopped
3 eggs
1 pkg. (12 ozs) semi-sweet chocolate chips (see notes)
Preheat oven to 350 degrees. Grease and flour two 7x11 cake pans or one 10x13 pan. (see notes)
Sift together dry ingredients, set aside. In a saucepan, melt margarine and brown sugar together. Add nuts and allow mixture to cool to room temperature.
After the butter mixture has cooled completely, add eggs, one at a time, mixing thoroughly between each egg. Pour mixture over dry ingredients and stir only enough to incorporate ingredients. Stir in chocolate chips and immediately pour into prepared pan. Bake for approximately 35 minutes or until a toothpick inserted into the middle comes out clean. Allow to cool for a few minutes and cut into squares while they’re still hot.
_____
*Please note- The recipe posted above is the original recipe. However, I have found that the following changes make mine turn out like they’re supposed to more consistently:
Use 2 eggs instead of 3
Reduce the flour to 2-1/4 cups instead of 2-3/4
NOTES-
As I said before, this recipe is somewhat temperamental to make. When done correctly, they turn out with a chewy brownie/blondie consistency with a crackled, glossy crust on top. When done incorrectly, they turn out cakey or hard and brittle. They're still tasty, they're just not as good as they'd be if they turn out correctly.
You *want* them to fall in the oven as they tend to be too cakey when they rise to the top of the pan. If they don’t fall on their own, shake the pan to help them fall.
Only use Parkay margarine (specifically); do not use real butter. The squares will stay soft and chewy once they cool if you use margarine due to the amount of vegetable oil/shortening used to make margarine. They’ll turn hard and somewhat brittle if you use real butter. My great-grandmother said to *only* use the Parkay brand of margarine.
I have found the following helps if you must use real butter in a pinch: add one tablespoon of shortening to the saucepan when you’re melting the butter and brown sugar mixture.
If you add the eggs to the butter and brown sugar mixture too soon, they’ll cook and cause the recipe to taste eggy. Try to let the mixture cool close to room temperature before you add the eggs.
The above ingredients are the original recipe. I usually omit the nuts and use 1/2 semi-sweet chocolate chips and 1/2 milk-chocolate chips.
This is optional but freezing the chocolate chips for at least 20 minutes before adding them to the recipe will keep them from completely melting in the oven. They'll still be melty and gooey, but freezing will help them keep their shape and prevent them from running into the batter.
Be sure to use all-purpose and not self-rising flour. Adding too much baking powder to self-rising flour will make the recipe turn out cakey and it will have a weird metallic/baking soda taste. If you must use self-rising flour, reduce the amount of baking powder to 1-1/4 teaspoons.
Using two 7x11 pans will make the squares turn out somewhat thinner.
Using one 10x13 pan will make the squares turn out thicker and a bit more dense than using two smaller pans. But if done correctly they will taste equally good.
You can use a 9x13 pan in a pinch but I have not yet been able to get mine to turn out using that size pan. They all end up too thick and/or running over the edge of the pan.
As with any recipe, using dark or coated pans will result in a medium brown crust; using an aluminum or enamel-coated pan will result in a light brown crust. However, the taste should be the same.
Funeral Sandwiches
I found this recipe on Pinterest* a few years ago and began making them for Super Bowl parties. They were such a hit with my family and friends that I'm frequently asked to make them when we have parties or are invited to a party.
My brother told me once that they're "painful." I was surprised he chose that particular word and asked what he meant. He said, "They're like freakin' crack! I can't stop eating them and end up hurting myself because I ate so many."
LOL He has a point.. they're YUMMY!!
Enjoy!
Funeral Sandwiches
(Party quantity)
4 packages of King's Hawaiian Rolls (I use the small square rolls)
1 1lb pack regular ham (see notes)
1 1lb pack regular turkey
1 package (12 slices) Muenster cheese
1 package (12 slices) American cheese
1 stick of butter, melted
3 T. Worcestershire sauce
2 T. yellow mustard
2-3 T. brown sugar
dash of onion powder
dash of garlic powder
Cut the rolls in half and line the bottom of a cookie sheet with the bottoms of the rolls. Put one layer of ham over rolls, followed by a layer of turkey. Then layer cheese over top of meat, alternating between Muenster and American so that the cheese looks somewhat like a checker board when you’re finished. You don’t need to overlap the cheese because it will melt together and sorta spread out once you put the sandwiches in the oven. Put the top layer of rolls back on top.
Using a spatula or large knife, carefully cut the sandwiches along the pre-scored lines, making sure to cut all the way through to the bottom layer. Do not separate the sandwiches- leave them close together.
Mix together the melted butter, Worcestershire, mustard, brown sugar, onion powder, and garlic powder. Drizzle the sauce over top of the sandwiches, making sure to drench each one and get down in between each sandwich.
OPTIONAL- Cover and marinate in the refrigerator anywhere from 4-24 hours. (This is why they’re called funeral sandwiches- they can be made up to a day in advance and then put into the oven just before you’re ready to eat.)
Preheat the oven to 350 degrees. Bake for 25 minutes uncovered or until cheese is melted and bun tops are a bit golden.
NOTES-
Since I am usually making these for a party, I use 4 packages of Hawaiian rolls. This recipe is easily halved or doubled based on how many servings you need.
Line your cookie sheet with tin foil and then spray with non-stick spray for easy clean-up.
Use regular/plain ham and turkey. Honey-baked, hickory smoked, or other flavored varieties will make the sandwiches taste bizarre.
I use Muenster and American cheeses because I like the way they melt and it’s what my family prefers; you can use whatever variety you’d like.
You can adjust the amount of mustard, Worcestershire, and brown sugar based on your personal preference.
*I'm usually a stickler for citing my source when I post a recipe, however, I found this one on Pinterest. Since there are several pins that list this recipe, I'm not sure which one was the original source. For reference- several different versions of this recipe can be found on Pinterest. Thanks!
My brother told me once that they're "painful." I was surprised he chose that particular word and asked what he meant. He said, "They're like freakin' crack! I can't stop eating them and end up hurting myself because I ate so many."
LOL He has a point.. they're YUMMY!!
Enjoy!
Funeral Sandwiches
(Party quantity)
4 packages of King's Hawaiian Rolls (I use the small square rolls)
1 1lb pack regular ham (see notes)
1 1lb pack regular turkey
1 package (12 slices) Muenster cheese
1 package (12 slices) American cheese
1 stick of butter, melted
3 T. Worcestershire sauce
2 T. yellow mustard
2-3 T. brown sugar
dash of onion powder
dash of garlic powder
Cut the rolls in half and line the bottom of a cookie sheet with the bottoms of the rolls. Put one layer of ham over rolls, followed by a layer of turkey. Then layer cheese over top of meat, alternating between Muenster and American so that the cheese looks somewhat like a checker board when you’re finished. You don’t need to overlap the cheese because it will melt together and sorta spread out once you put the sandwiches in the oven. Put the top layer of rolls back on top.
Using a spatula or large knife, carefully cut the sandwiches along the pre-scored lines, making sure to cut all the way through to the bottom layer. Do not separate the sandwiches- leave them close together.
Mix together the melted butter, Worcestershire, mustard, brown sugar, onion powder, and garlic powder. Drizzle the sauce over top of the sandwiches, making sure to drench each one and get down in between each sandwich.
OPTIONAL- Cover and marinate in the refrigerator anywhere from 4-24 hours. (This is why they’re called funeral sandwiches- they can be made up to a day in advance and then put into the oven just before you’re ready to eat.)
Preheat the oven to 350 degrees. Bake for 25 minutes uncovered or until cheese is melted and bun tops are a bit golden.
NOTES-
Since I am usually making these for a party, I use 4 packages of Hawaiian rolls. This recipe is easily halved or doubled based on how many servings you need.
Line your cookie sheet with tin foil and then spray with non-stick spray for easy clean-up.
Use regular/plain ham and turkey. Honey-baked, hickory smoked, or other flavored varieties will make the sandwiches taste bizarre.
I use Muenster and American cheeses because I like the way they melt and it’s what my family prefers; you can use whatever variety you’d like.
You can adjust the amount of mustard, Worcestershire, and brown sugar based on your personal preference.
*I'm usually a stickler for citing my source when I post a recipe, however, I found this one on Pinterest. Since there are several pins that list this recipe, I'm not sure which one was the original source. For reference- several different versions of this recipe can be found on Pinterest. Thanks!
September 26, 2014
Pumpkin Spice Syrup
I love pumpkin spice anything. No, really, I do. I'd eat a piece of cardboard if it had pumpkin spice smeared on it.
My very favorite local coffee shop, Montego Bay Coffee, closed its doors about a year ago and I still miss them.
(see: Where Everybody Knows Your Name)
I used to look forward to the September day when Pumpkin Spice Lattes were put back on the menu and would often be their "taste tester" in the days before the annual release. I was a regular customer and usually dropped by several times a week. However, during PSL season it wasn't uncommon for me to drink one there in the shop while I chatted & read the newspaper, and then get another one for the road too.
The following recipe is similar to Montego Bay's recipe for Pumpkin Spice syrup. While it's not exactly the same, it's better than Starbucks has ever even thought about being. And it contains actual pumpkin, which is not the case at Starbucks. I'm not sure exactly how much to use, though. I suppose that is up to you and your individual love for pumpkin spice. I personally use several tablespoons (roughly two shots) in a 24 ounce latte made with several shots of espresso and steamed milk with plenty of foam.

1 ½ cups white sugar
1 heaping tablespoon brown sugar
1 cup water
3 heaping tablespoons canned pumpkin (not pumpkin pie mix)
2 tablespoons pumpkin pie spice
1 tablespoon ground cinnamon
Splash of vanilla
In small saucepan, stir together sugars and water. Cook until sugar is dissolved (do not boil). Beat in pumpkin, pumpkin pie spice, and vanilla with whisk. Cook 5 minutes longer. Mix should be bubbly but do not allow to come to a full boil. Remove from heat. Allow to cool completely and pour syrup into bottle, jar or storage container. Store in refrigerator.
NOTES-
I prefer my latte with bits of spice and pumpkin in it so I don’t strain my syrup. If you prefer yours smooth, make sure you strain the syrup well before you put it into a storage container. Use cheesecloth or a mesh strainer while the syrup is still hot.
Mixture will be bubbly but do not allow it to boil. I recommend constantly stirring after you add the pumpkin so it does not stick to the pan.

My very favorite local coffee shop, Montego Bay Coffee, closed its doors about a year ago and I still miss them.
(see: Where Everybody Knows Your Name)
I used to look forward to the September day when Pumpkin Spice Lattes were put back on the menu and would often be their "taste tester" in the days before the annual release. I was a regular customer and usually dropped by several times a week. However, during PSL season it wasn't uncommon for me to drink one there in the shop while I chatted & read the newspaper, and then get another one for the road too.
The following recipe is similar to Montego Bay's recipe for Pumpkin Spice syrup. While it's not exactly the same, it's better than Starbucks has ever even thought about being. And it contains actual pumpkin, which is not the case at Starbucks. I'm not sure exactly how much to use, though. I suppose that is up to you and your individual love for pumpkin spice. I personally use several tablespoons (roughly two shots) in a 24 ounce latte made with several shots of espresso and steamed milk with plenty of foam.

1 ½ cups white sugar
1 heaping tablespoon brown sugar
1 cup water
3 heaping tablespoons canned pumpkin (not pumpkin pie mix)
2 tablespoons pumpkin pie spice
1 tablespoon ground cinnamon
Splash of vanilla
In small saucepan, stir together sugars and water. Cook until sugar is dissolved (do not boil). Beat in pumpkin, pumpkin pie spice, and vanilla with whisk. Cook 5 minutes longer. Mix should be bubbly but do not allow to come to a full boil. Remove from heat. Allow to cool completely and pour syrup into bottle, jar or storage container. Store in refrigerator.
NOTES-
I prefer my latte with bits of spice and pumpkin in it so I don’t strain my syrup. If you prefer yours smooth, make sure you strain the syrup well before you put it into a storage container. Use cheesecloth or a mesh strainer while the syrup is still hot.
Mixture will be bubbly but do not allow it to boil. I recommend constantly stirring after you add the pumpkin so it does not stick to the pan.

January 10, 2014
Toasted Coconut Cake
Many of my recipes are passed down through generations of my family of fabulous cooks or adapted from another recipe. While the basis for this recipe- yellow cake, seven minute frosting, and coconut sprinkled on top- came from my mother's coconut cake recipe, the rest was all me. I don't often hit a home run when I attempt to create something new out of something tried and true. More often than not, my attempt ends up summoning a demon or some such. (I kid, of course! LOL) But in this case, I hit it out of the ballpark with this one. There is never so much as a crumb left when I take this cake anywhere. They whisper, "Oh my gosh! Cari brought her toasted coconut cake! Go get a piece before it disappears!"
Toasted Coconut Cake
1 box white (or yellow) cake mix (plus ingredients on box)
1 can cream of coconut
1 can coconut milk
1 recipe of 7 Minute Frosting (recipe follows)
1 bag coconut- reserve 1/3 for cake mix
Prepare cake mix in a 9x13 pan according to directions on box but instead of the water, use coconut milk- it should equal about one cup. Add a third of the coconut to the mix. (The rest will be toasted and used as a topping.) Bake cake according to directions on box. While cake is still hot, poke holes all over entire cake using a fork or a skewer. Pour cream of coconut evenly over top and allow it to sit for several minutes (or overnight) to soak into cake. While you’re waiting, prepare the frosting (recipe follows) and toast the coconut. Spread frosting over top of cake and then sprinkle with toasted coconut.
Notes-
Be sure you use coconut milk in place of the water before you bake the cake, and cream of coconut after the cake is baked. If you reverse the two, the cake will be a milky, soupy mess.
To toast coconut-
Spread coconut evenly over cookie sheet and bake for about 10 minutes in a 350* oven, shaking the pan every few minutes to make sure it doesn’t stick or burn. Watch very carefully as it will burn very easily!
7 Minute Frosting
2 egg whites
1 ½ cups white sugar
1/3 c. water
1/4 t. cream of tartar (or 2 t. light corn syrup)
1 T. vanilla
Dash of salt
In the bottom pot of a double boiler, heat water to a simmering boil. Put ingredients into top pot and place over boiling water. With an electric mixer, beat ingredients on low until mixture begins to foam then increase speed to medium. Set timer for seven minutes as you cook the frosting. Mixture will begin to turn white and form stiff peaks. After seven minutes, remove the pot from the heat and add vanilla. Turn mixer down to low speed and blend in vanilla. Use frosting immediately after cooking.
Notes-
Do not allow top pot to touch boiling water in bottom pot as it will cause the mixture to crystallize on the bottom of the pot.
You can use either cream of tartar or light corn syrup. It acts as a stabilizer for the egg whites.
Use frosting immediately- do not allow it to sit in pot after you’ve prepared it as it will set and become brittle.
Toasted Coconut Cake
1 box white (or yellow) cake mix (plus ingredients on box)
1 can cream of coconut
1 can coconut milk
1 recipe of 7 Minute Frosting (recipe follows)
1 bag coconut- reserve 1/3 for cake mix
Prepare cake mix in a 9x13 pan according to directions on box but instead of the water, use coconut milk- it should equal about one cup. Add a third of the coconut to the mix. (The rest will be toasted and used as a topping.) Bake cake according to directions on box. While cake is still hot, poke holes all over entire cake using a fork or a skewer. Pour cream of coconut evenly over top and allow it to sit for several minutes (or overnight) to soak into cake. While you’re waiting, prepare the frosting (recipe follows) and toast the coconut. Spread frosting over top of cake and then sprinkle with toasted coconut.
Notes-
Be sure you use coconut milk in place of the water before you bake the cake, and cream of coconut after the cake is baked. If you reverse the two, the cake will be a milky, soupy mess.
To toast coconut-
Spread coconut evenly over cookie sheet and bake for about 10 minutes in a 350* oven, shaking the pan every few minutes to make sure it doesn’t stick or burn. Watch very carefully as it will burn very easily!
7 Minute Frosting
2 egg whites
1 ½ cups white sugar
1/3 c. water
1/4 t. cream of tartar (or 2 t. light corn syrup)
1 T. vanilla
Dash of salt
In the bottom pot of a double boiler, heat water to a simmering boil. Put ingredients into top pot and place over boiling water. With an electric mixer, beat ingredients on low until mixture begins to foam then increase speed to medium. Set timer for seven minutes as you cook the frosting. Mixture will begin to turn white and form stiff peaks. After seven minutes, remove the pot from the heat and add vanilla. Turn mixer down to low speed and blend in vanilla. Use frosting immediately after cooking.
Notes-
Do not allow top pot to touch boiling water in bottom pot as it will cause the mixture to crystallize on the bottom of the pot.
You can use either cream of tartar or light corn syrup. It acts as a stabilizer for the egg whites.
Use frosting immediately- do not allow it to sit in pot after you’ve prepared it as it will set and become brittle.
October 7, 2013
Mrs. Wells' Pumpkin Cake

The original recipe (which was the precursor to the following one) came from a lady named Mrs. Wells, who was the Home Ec teacher at West Nassau High School for many years. I believe it may have actually come from her mother. Anyway, I took her recipe, added cream cheese, played around with some of the spices, added frosting, removed the nuts, etc... long story short- this is my personal variation of Mrs. Wells' pumpkin cake. In my opinion, this cake is actually better than Starbucks. It's richer, denser, more moist... aww heck, it's just plain scrumptious! However, props still go to Mrs. Wells. I never knew her, but her cake will forever be a family favorite of ours.
Pumpkin Cake with Cream Cheese Frosting
1 cup (two sticks) unsalted butter, softened
3 cups granulated sugar
4 oz. cream cheese (softened)
3 eggs
1 lb* can solid-pack pumpkin (NOT pie filling mix!)
1 t. vanilla
3 cups sifted flour
3 t. pumpkin pie spice
1 c chopped nuts (optional)
1 c raisins (optional)
½ c roasted pumpkin seeds (optional- see notes)
Preheat oven to 350 degrees. Grease and flour a Bundt or tube pan. Set aside.
In a mixing bowl, sift together flour with cinnamon, cloves, nutmeg, (and nuts/raisins, if desired), set aside.
In a large bowl, mix butter, sugar, and cream cheese until fluffy. Stir in pumpkin, eggs, and vanilla until blended. Add flour, a cup at a time, to the pumpkin mixture. Using the lowest setting on your mixer, mix ingredients until just blended. Do not over-stir!
If you’re adding nuts or raisins, fold in carefully using a wooden spoon. Pour mixture into the prepared pan and bake in a 350 degree oven for 1 hour. After one hour, check doneness using a toothpick or butter knife. If it’s not done, bake 10-15 additional minutes or until tester comes out clean.
Allow to cool completely and frost with cream cheese frosting. (Recipe follows) Store loosely covered in the refrigerator.
NOTES:
-*Be sure you’re using the large can of solid-pack pumpkin and NOT pie filling mix. The recipe will not turn out if you use pie filling mix instead of pumpkin.
-I use the Libby’s brand name of pumpkin, but I’m sure any brand will do. The can actually says that its 29 ounces, which is 1 lb + 13 ozs- that’s the can you want to use.
-Blend the ingredients just until they’re incorporated. Over-stirring will cause the end result to have a weird spongy texture.
-I rarely use nuts or raisins in this cake because my family doesn’t like them. It turns out amazing without using either.
-For fun variety, you can omit the frosting and gently press chopped pumpkin seeds into the top of the cake after you’ve turned it out onto a plate. Or you can frost the cake as usual and then sprinkle pumpkin seeds on top. Either way is delicious.
-Or if you don't care for cream cheese frosting, sprinkle the top generously with powdered sugar. This is how my Mama prefers to make hers.
Cream Cheese Frosting
1/2 stick (1/4 cup) unsalted butter (softened)
4 oz cream cheese (softened)
2 cups powdered sugar
1/2 t. vanilla (see notes)
Using a mixer, blend the butter and cream cheese until combined. Add the powdered sugar and vanilla and beat until the mixture is light and fluffy- approximately 10 minutes. The frosting will become a thicker and fluffier the longer you beat it.
NOTES:
-I use a stand mixer for this recipe.
-I use additional powdered sugar if I need it to be stiffer.
-Do not be tempted to use additional vanilla, milk, or water because the frosting will be thin and drizzly.
-Store frosted food in the refrigerator as this frosting is perishable.
December 10, 2012
Santa's White Christmas
Many of you know that I am a complete snob when it comes to coffee. In my opinion, there are few things better than a good cup of coffee and few things worse than a bad cup of coffee. A couple years ago, I discovered Barnie's Santa's White Christmas ground coffee and then in subsequent years I had a hard time finding it here locally. So I decided to come up with a similar recipe using other ingredients. The following is what I came up with. While it's not exactly the same, it's a pretty darn good treat on a chilly December day. Enjoy!
Santa's White Christmas
¼ c French Vanilla Cappuccino mix (see notes)
¾ to 1 cup of milk (judge based on the size of your mug)
½ oz (1 T) Hazelnut flavored syrup (see notes)
½ oz (1 T) caramel ice cream topping + some for drizzling
whipped cream
1 t. toasted coconut (see notes)
Put French Vanilla Cappuccino mix into a large/oversized mug. Heat milk until hot but not boiling. (I use the milk steamer wand on my espresso machine for this part, but you can also use the microwave) Pour milk over Cappuccino mix and stir. Add hazelnut and caramel; stir well. Put a generous amount of whipped cream, drizzle additional caramel, and then sprinkle toasted coconut on top. Enjoy!
Notes-
I use Folger’s French Vanilla Cappuccino mix, available in the aisle where coffee is sold in most grocery stores
I use Torani (or the store brand) Hazelnut syrup, also available in the aisle where coffee is sold in most grocery stores
Toasting the coconut adds a special taste that you can’t duplicate unless the coconut is toasted
To toast coconut-
I make it in my toaster oven. I spray the pan with cooking spray and then sprinkle one teaspoon of coconut onto the pan. Then I spray it with more cooking spray and put it into the toaster oven on the lightest setting. You may need to hit the button twice to achieve a light golden brown. Be sure to watch it carefully as the coconut will burn very easily.
Santa's White Christmas
¼ c French Vanilla Cappuccino mix (see notes)
¾ to 1 cup of milk (judge based on the size of your mug)
½ oz (1 T) Hazelnut flavored syrup (see notes)
½ oz (1 T) caramel ice cream topping + some for drizzling
whipped cream
1 t. toasted coconut (see notes)
Put French Vanilla Cappuccino mix into a large/oversized mug. Heat milk until hot but not boiling. (I use the milk steamer wand on my espresso machine for this part, but you can also use the microwave) Pour milk over Cappuccino mix and stir. Add hazelnut and caramel; stir well. Put a generous amount of whipped cream, drizzle additional caramel, and then sprinkle toasted coconut on top. Enjoy!
Notes-
I use Folger’s French Vanilla Cappuccino mix, available in the aisle where coffee is sold in most grocery stores
I use Torani (or the store brand) Hazelnut syrup, also available in the aisle where coffee is sold in most grocery stores
Toasting the coconut adds a special taste that you can’t duplicate unless the coconut is toasted
To toast coconut-
I make it in my toaster oven. I spray the pan with cooking spray and then sprinkle one teaspoon of coconut onto the pan. Then I spray it with more cooking spray and put it into the toaster oven on the lightest setting. You may need to hit the button twice to achieve a light golden brown. Be sure to watch it carefully as the coconut will burn very easily.
Naughty or Nice Hot Cocoa

I usually make the "naughty" version, which includes Buttershots, whole milk, and all the sprinklings, trimmings, and whipped cream. But if you're trying to be "nice", you can make it with skim milk and follow the non-alcoholic version listed in the notes. Either way, it's YUMMY!
Naughty or Nice Hot Cocoa
1 envelope of your favorite cocoa mix
¾ c to 1 cup milk (judge based on the size of your mug)
½ oz. (1 T) Buttershots (see non-alcoholic version in notes)
½ oz. (1 T) chocolate syrup
nutmeg
whipped cream
colored sugar sprinkles, chocolate shavings, mini chocolate chips, or whatever other topping you might desire
Put the cocoa mix and a light shake of nutmeg into a large/oversized mug. Heat milk until hot but not boiling. (I use the milk steamer wand on my espresso machine for this part, but you can also use the microwave.) Pour milk over cocoa mix and stir. Add Buttershots and chocolate syrup; stir. Put a generous amount of whipped cream on top and add sprinkles of toppings. Enjoy!
Notes-
*Buttershots is a brand name for butterscotch schnapps
To make an equally good, non-alcoholic variation of this recipe, use a tablespoon of butterscotch ice cream topping instead of Buttershots. (That’s how I make it for my kids.)
You can use half & half instead of milk, if you’re feeling naughty
I use Swiss Miss or Carnation milk chocolate cocoa mix, but you can use whatever is your favorite
Variations-
Mocha Cocoa: Add one tablespoon of your favorite flavored instant coffee mix to the original recipe. I like to use Café Vienna by GFIC, available on the aisle where coffee is sold in most grocery stores.
Peppermint Cocoa: Omit Buttershots and nutmeg. Instead, use ¼ t. peppermint extract and put crushed peppermint on top.
Cinnamon Cocoa: Omit Buttershots and nutmeg. Instead, use ½ oz. Goldschlager and a shake of cinnamon.
*Goldschlager is a brand name for cinnamon schnapps
October 9, 2012
Apple Pull-Apart Bread
Ya'll know I love trying new recipes. When my sister found this one, she promptly forwarded it to me, knowing how much I adore warm, buttery, cinnamony, recipes that are best served with a hot cup of coffee on a crisp autumn day. I cannot wait to try it!
 Ingredients:
For the Dough:
2-3/4c all-purpose flour (plus 1/4 cup or more, if needed)
1/4c sugar
2-1/4t active dry yeast
1/2t salt
4T butter, melted
1/3c milk
1/4c warm water
1t vanilla extract
2 eggs
For the filling:
3/4c brown sugar
2t cinnamon
pinch of salt
3T butter, melted
1 large tart apple, peeled, cored, and diced (Golden Delicious or Granny Smith recommended)
For the Caramel Glaze:
2T butter
1/2c brown sugar
2T milk
Instructions
To the bowl of a stand-mixer fitted with the dough hook attachment, combine warm water and yeast.
In a microwave-safe dish, heat milk and butter together until butter is just melted, but not too hot. Add vanilla.
Add flour, sugar, and salt on top of water/yeast mixture in mixing bowl. Turn mixer on low, add eggs, and stream in milk/butter/egg mixture gradually until a soft dough forms. Add flour by the tablespoon until the dough pulls away from the sides of the bowl and forms a ball. Turn mixer up to medium speed and knead 3 minutes. Cover and let rise in a warm place 90 minutes.
Meanwhile, in a small bowl mix together the brown sugar, cinnamon, and salt for the filling. Set aside. Prepare your apples and melt butter just before the dough is done rising. Grease a standard 9x5 loaf pan.
Turn risen dough out onto a floured work surface and roll out into a large rectangle (roughly 12x24 inches, but it doesn't need to be perfect). Dough will be rather thin.
Brush dough with melted butter. Sprinkle the entire surface with the cinnamon sugar mixture.
Using a pizza wheel, cut dough into equal-sized, long strips. Sprinkle the first strip with 1/6th of the diced apples. Lay the next strip on top of the first strip. Sprinkle with apples and cover with another strip. Repeat until all the strips are stacked on top of each other.
Cut the stacked strips into 4-6 equal stacks of squares (about 4-5 inches in size). Stack the squares vertically into prepared loaf pan. Cover with a kitchen towel and let rise 30-45 minutes.
Preheat oven to 350. Bake the bread on the middle rack of oven 40-45 minutes or until golden brown and cooked through (check center for doughiness). If the bread gets too brown on top before it is done cooking in the center, cover loosely with foil for the remainder of cooking time.
Cool on a wire rack for 10 minutes. Meanwhile, prepare the glaze by adding the butter, brown sugar and milk to a saucepan over medium heat. Bring to a boil and cook for 1 minute.
Turn loaf out onto a rack with parchment paper underneath it. Drizzle the loaf with the warm caramel glaze.
Best enjoyed the same day it is baked.
*Recipe courtesy of Alaskafromscratch.com If you copy this recipe, please give proper credit. Thanks! :)

For the Dough:
2-3/4c all-purpose flour (plus 1/4 cup or more, if needed)
1/4c sugar
2-1/4t active dry yeast
1/2t salt
4T butter, melted
1/3c milk
1/4c warm water
1t vanilla extract
2 eggs
For the filling:
3/4c brown sugar
2t cinnamon
pinch of salt
3T butter, melted
1 large tart apple, peeled, cored, and diced (Golden Delicious or Granny Smith recommended)
For the Caramel Glaze:
2T butter
1/2c brown sugar
2T milk
Instructions
To the bowl of a stand-mixer fitted with the dough hook attachment, combine warm water and yeast.
In a microwave-safe dish, heat milk and butter together until butter is just melted, but not too hot. Add vanilla.
Add flour, sugar, and salt on top of water/yeast mixture in mixing bowl. Turn mixer on low, add eggs, and stream in milk/butter/egg mixture gradually until a soft dough forms. Add flour by the tablespoon until the dough pulls away from the sides of the bowl and forms a ball. Turn mixer up to medium speed and knead 3 minutes. Cover and let rise in a warm place 90 minutes.
Meanwhile, in a small bowl mix together the brown sugar, cinnamon, and salt for the filling. Set aside. Prepare your apples and melt butter just before the dough is done rising. Grease a standard 9x5 loaf pan.
Turn risen dough out onto a floured work surface and roll out into a large rectangle (roughly 12x24 inches, but it doesn't need to be perfect). Dough will be rather thin.
Brush dough with melted butter. Sprinkle the entire surface with the cinnamon sugar mixture.
Using a pizza wheel, cut dough into equal-sized, long strips. Sprinkle the first strip with 1/6th of the diced apples. Lay the next strip on top of the first strip. Sprinkle with apples and cover with another strip. Repeat until all the strips are stacked on top of each other.
Cut the stacked strips into 4-6 equal stacks of squares (about 4-5 inches in size). Stack the squares vertically into prepared loaf pan. Cover with a kitchen towel and let rise 30-45 minutes.
Preheat oven to 350. Bake the bread on the middle rack of oven 40-45 minutes or until golden brown and cooked through (check center for doughiness). If the bread gets too brown on top before it is done cooking in the center, cover loosely with foil for the remainder of cooking time.
Cool on a wire rack for 10 minutes. Meanwhile, prepare the glaze by adding the butter, brown sugar and milk to a saucepan over medium heat. Bring to a boil and cook for 1 minute.
Turn loaf out onto a rack with parchment paper underneath it. Drizzle the loaf with the warm caramel glaze.
Best enjoyed the same day it is baked.
*Recipe courtesy of Alaskafromscratch.com If you copy this recipe, please give proper credit. Thanks! :)
January 20, 2012
Sopapilla "Soapy" Cheesecake
I stumbled upon this recipe via Pinterest and thought it looked interesting. It has now become one of my go-to recipes when I need a quick dessert since it's so easy to throw together and tastes amazing. Everyone who has had it loves it and thinks it took a lot more effort than it did.
The first time I made it, I pronounced the name and Christopher said, "Hah! Sounds like 'soapy' cheesecake to me!" Hence, a nickname was born and will probably always be referred to in our house as "Soapy Cheesecake."
The following is based on a Pinterest recipe, with a tweak or two of my own. My dear friend, Brian G., is responsible for the addition of honey to my original recipe. Thanks Brian!
Sopapilla "Soapy" Cheesecake
 Ingredients:
2 cans Pillsbury buttery crescent rolls
2 (8oz) packages cream cheese (softened)
1 cup sugar
1 teaspoon vanilla
1/3 cup melted butter
Cinnamon & sugar (to sprinkle on top)
1/3 cup honey (see notes)
Instructions:
Unroll and spread one can of crescent rolls on bottom of ungreased 9x13 pan. Combine softened cream cheese, sugar, and vanilla. Spread mixture over crescent rolls. Unroll and spread remaining crescent rolls over mixture. Spread melted butter over the top and sprinkle with cinnamon and sugar. Bake at 350 degrees for 20-30 minutes. When you pull it out of the oven, immediately drizzle honey over top. Store in the refrigerator.
Notes:
If you're not accustomed to cooking with honey, I recommend using a lighter honey such as Acacia, Alfalfa, orange blossom or Tupelo, instead of a darker honey like wildflower. Adding honey can make this extremely sweet, depending on what variety of honey you use. Personally, I use orange blossom or Tupelo honey because of it has a sweet mild flavor and doesn't overwhelm the other flavors.
The first time I made it, I pronounced the name and Christopher said, "Hah! Sounds like 'soapy' cheesecake to me!" Hence, a nickname was born and will probably always be referred to in our house as "Soapy Cheesecake."
The following is based on a Pinterest recipe, with a tweak or two of my own. My dear friend, Brian G., is responsible for the addition of honey to my original recipe. Thanks Brian!
Sopapilla "Soapy" Cheesecake

2 cans Pillsbury buttery crescent rolls
2 (8oz) packages cream cheese (softened)
1 cup sugar
1 teaspoon vanilla
1/3 cup melted butter
Cinnamon & sugar (to sprinkle on top)
1/3 cup honey (see notes)
Instructions:
Unroll and spread one can of crescent rolls on bottom of ungreased 9x13 pan. Combine softened cream cheese, sugar, and vanilla. Spread mixture over crescent rolls. Unroll and spread remaining crescent rolls over mixture. Spread melted butter over the top and sprinkle with cinnamon and sugar. Bake at 350 degrees for 20-30 minutes. When you pull it out of the oven, immediately drizzle honey over top. Store in the refrigerator.
Notes:
If you're not accustomed to cooking with honey, I recommend using a lighter honey such as Acacia, Alfalfa, orange blossom or Tupelo, instead of a darker honey like wildflower. Adding honey can make this extremely sweet, depending on what variety of honey you use. Personally, I use orange blossom or Tupelo honey because of it has a sweet mild flavor and doesn't overwhelm the other flavors.
September 28, 2011
Molten Chocolate Lava Cake

8oz Bittersweet chocolate
8 tablespoon butter (1 stick)
plus more for ramekins
3 eggs
1/2 cup granulated sugar
1/2 cup flour
1 teaspoon vanilla
Preheat oven to 400 degrees F.
Generously butter four 6 ounce ramekins.
Place the prepared molds on a baking sheet and set aside. Melt the chocolates and butter in a double boiler. In the bowl of an electric mixer, beat the eggs and sugar until pale, about two minutes, beat in the vanilla. Stir in the egg mixture into the chocolate and then add the flour, mix well. Divide the batter among the prepared ramekins and bake for 12 to 15 minutes, the edges should be firm and set but the center will still look a little wet. Serve immediately with vanilla bean ice cream. You can serve them in the ramekins or run a knife around the edges to loosen and invert onto dessert plates.
*Recipe and Image courtesy of: Delicious Shots
September 25, 2011
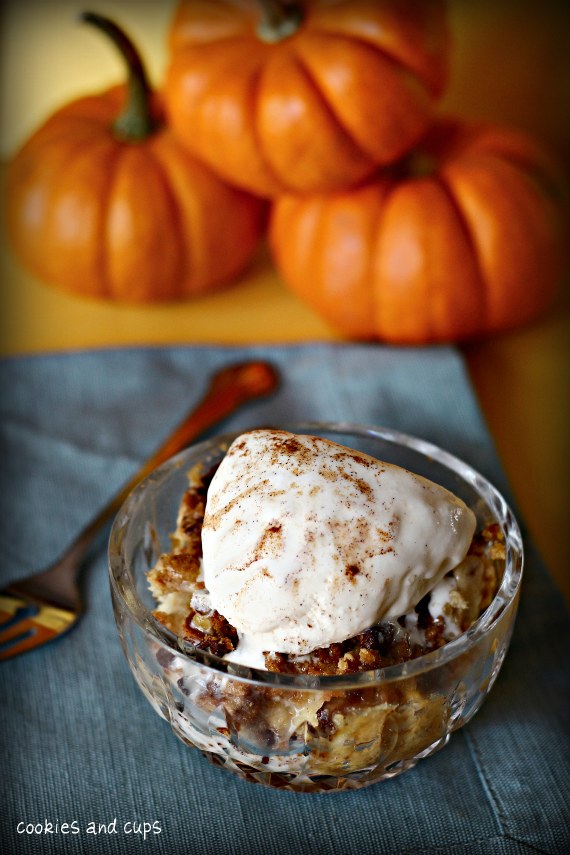
Pumpkin Dump Cake
1 15 oz can Pumpkin Puree
1 10 oz can Evaporated Milk
1 cup light brown sugar
3 eggs
3 tsp pumpkin pie spice
1 box yellow cake mix
1 cup (2 sticks) butter- melted
1 cup chopped pecans
1/2 cup toffee bits (optional)
Directions:
Preheat oven to 350
Spray a 9×13 baking pan lightly with cooking/baking spray. In a large bowl combine the pumpkin, evaporated milk, sugar, eggs and pumpkin pie spice. Stir to combine.
Pour into prepared pan. Sprinkle entire box of cake mix on top, followed by nuts and toffee chips. Pour melted butter evenly on top.
Bake for 45-50 minutes until center is set and edges are lightly browned.
NOTES-
Be sure you're using pumpkin puree and NOT pie filling- there is a difference.
I used a Duncan Hines butter yellow cake mix.
For those with nut allergies, try using crushed graham crackers in place of the nuts.
Serve with ice cream or whipped cream.
*Recipe and Image courtesy of: Cookies and Cups
September 22, 2011
Chicken Saltimbocca
I'm not Italian. Not even a teeny bit by marriage of a fourth cousin on my mother's side twice removed... zero, zip, zilch, nada, niente. But, I am a foodie. I love good food, regardless of its origin. The following recipe is my personal variation of Buca DiBeppo's chicken saltimbocca.
 Ingredients
4 (5 ounce) chicken breasts
4 thin slices prosciutto ham
2 T. fresh sage- chopped well
3 ounces olive oil
1 ounce all-purpose flour
5 ounces artichoke hearts, quartered & drained
1/2 ounce capers- drained well
4 ounces white wine
2 ounces fresh lemon juice
2 ounces heavy cream
½ stick butter
½ t. lemon zest
1 tablespoon salt
Lightly salt chicken breasts. Sprinkle evenly with chopped sage. Place sliced prosciutto on top the chicken and pound it into the breast until the thickness of the chicken measures 3/8-inch.
Meanwhile, heat olive oil in a sauté pan. Place chicken in heated oil, prosciutto side down. Brown one side, turn and brown the other side. Move to a tray. Drain excess oil from pan and deglaze with 4 ounces of white wine. Whisk in flour, artichokes, fresh lemon juice, cream and butter to deglazed wine. Cook until sauce is thickened. Add chicken back to the pan, add capers and lemon zest. Serve immediately.
Serves 4.
Notes-
Only use wine you'd drink from a glass.

4 (5 ounce) chicken breasts
4 thin slices prosciutto ham
2 T. fresh sage- chopped well
3 ounces olive oil
1 ounce all-purpose flour
5 ounces artichoke hearts, quartered & drained
1/2 ounce capers- drained well
4 ounces white wine
2 ounces fresh lemon juice
2 ounces heavy cream
½ stick butter
½ t. lemon zest
1 tablespoon salt
Lightly salt chicken breasts. Sprinkle evenly with chopped sage. Place sliced prosciutto on top the chicken and pound it into the breast until the thickness of the chicken measures 3/8-inch.
Meanwhile, heat olive oil in a sauté pan. Place chicken in heated oil, prosciutto side down. Brown one side, turn and brown the other side. Move to a tray. Drain excess oil from pan and deglaze with 4 ounces of white wine. Whisk in flour, artichokes, fresh lemon juice, cream and butter to deglazed wine. Cook until sauce is thickened. Add chicken back to the pan, add capers and lemon zest. Serve immediately.
Serves 4.
Notes-
Only use wine you'd drink from a glass.
September 20, 2011
Crock Pot Potato Soup

Ingredients:
- 5lbs Russet Potatoes, washed but NOT peeled. Diced into 1/2 inch(ish) cubes
- 1 medium to large yellow onion, diced
- 10 cloves of garlic, whole
- 8 cups chicken stock
- 16 oz cream cheese
- 1 TBS seasoned salt or all-purpose seasoning (I used Emeril's Bayou Blast)
Garnishes:
- Crumbled bacon
- Shredded cheddar cheese
- Green onions
Directions:
- Add potatoes, onion, garlic, seasoning and chicken stock to slow cooker.
- Cook on high for 6 hours or low for 10 hours.
- Remove and puree the garlic cloves along with 1/2 to 1/3rd of the soup, and then reintroduce to the remainder in the crock pot.
- Stir in the cream cheese and allow to melt. Stir every 10-15 minutes until soup is well blended.
- Top with your choice of garnishes & serve!
Yields about 10-12 servings.
Recipe and image courtesy of Mama Loves Food!
September 19, 2011
Blueberry Breakfast Cake

½ cup unsalted butter, room temperature
2 tsp. lemon zest or more — zest from 1 large lemon
7/8 cup + 1 T. sugar
1 egg, room temperature
1 tsp. vanilla
2 cups flour
2 tsp. baking powder
1 tsp. kosher salt
2 cups fresh blueberries
½ cup buttermilk
1. Preheat the oven to 350ºF. Cream butter with lemon zest and 7/8 cup of the sugar until light and fluffy.
2. Add the egg and vanilla and beat until combined. Meanwhile, toss the blueberries with ¼ cup of flour, then whisk together the remaining flour, baking powder and salt.
3. Add the flour mixture to the batter a little at a time, alternating with the buttermilk. Fold in the blueberries.
4. Grease a 9-inch square baking pan (or something similar) with butter or coat with non-stick spray. Spread batter into pan. Sprinkle batter with remaining tablespoon of sugar. Bake for 35 minutes. Check with a toothpick for doneness. If necessary, return pan to oven for a couple of more minutes. (Note: Baking for as long as 10 minutes more might be necessary.) Let cool at least 15 minutes before serving.
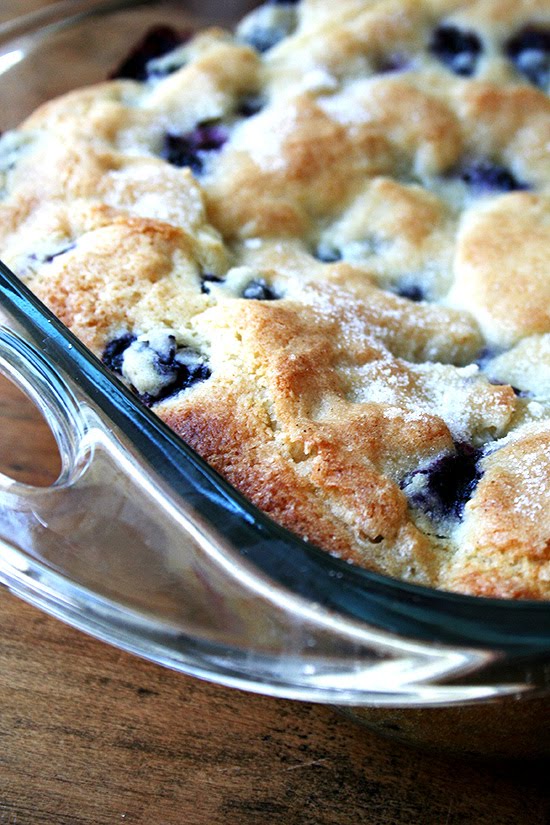
Recipe and images courtesy of Alexandra's Kitchen
September 11, 2011
Pumpkin Cream Cheese Muffins

8 oz. cream cheese, softened
1 cup confectioners' sugar
For the muffins:
3 cups all-purpose flour
1 tsp. ground cinnamon
1 tsp. ground nutmeg
1 tsp. ground cloves
1 tbsp. plus 1 tsp. pumpkin pie spice
1 tsp. salt
1 tsp. baking soda
4 large eggs
2 cups sugar
2 cups pumpkin puree
1¼ cups vegetable oil
For the topping:
½ cup sugar
5 tbsp. flour
1½ tsp. ground cinnamon
4 tbsp. cold unsalted butter, cut into pieces
Directions:
To prepare the filling, combine the cream cheese and confectioners' sugar in a medium bowl and mix well until blended and smooth. Transfer the mixture to a piece of plastic wrap and shape into a log about 1½-inches in diameter. Smooth the plastic wrap tightly around the log, and reinforce with a piece of foil. Transfer to the freezer and chill until at least slightly firm, at least 2 hours.
To make the muffins, preheat the oven to 350˚ F. Line muffin pans with paper liners. In a medium bowl, combine the flour, cinnamon, nutmeg, cloves, pumpkin pie spice, salt and baking soda; whisk to blend. In the bowl of an electric mixer combine the eggs, sugar, pumpkin puree and oil. Mix on medium-low speed until blended. With the mixer on low speed, add in the dry ingredients, mixing just until incorporated.
To make the topping, combine the sugar, flour and cinnamon in a small bowl; whisk to blend. Add in the butter pieces and cut into the dry ingredients with a pastry blender or two forks until the mixture is coarse and crumbly. Transfer to the refrigerator until ready to use.
To assemble the muffins, fill each muffin well with a small amount of batter, just enough to cover the bottom of the liner (1-2 tablespoons). Slice the log of cream cheese filling into 24 equal pieces. Place a slice of the cream cheese mixture into each muffin well. Divide the remaining batter among the muffin cups, placing on top of the cream cheese to cover completely. Sprinkle a small amount of the topping mixture over each of the muffin wells.
Bake for 20-25 minutes. Transfer to a wire rack and let cool completely before serving. (It may be hard to resist immediate consumption, but the cream cheese filling gets very hot!)
Recipe courtesy of Annie's Eats Image courtesy AllRecipes.com.
September 10, 2011
Cream Cheese Pound Cake
While most recipes I have came from one of the fabulous cooks in my family, believe it or not, this one is actually mine.
 Ingredients:
3 c. white sugar
3 sticks real butter (no substitutes)
1 8oz. package cream cheese
6 eggs
3-1/2 c. sifted all-purpose flour
1 t. real vanilla
Glaze:
1 c. powdered sugar
1 stick butter (softened)
¼-1/2 t. lemon juice (see notes for alternate recipe)
Cream together softened cream cheese, butter and sugar until light and fluffy. Add room-temperature eggs alternately with flour. Add vanilla last. Be careful not to over-stir!
Spoon into prepared tube pan. Place into a cold oven and bake at 350 for 1 hour. Reduce heat to 325 and bake 1 to 1-1/2 additional hours till tester comes out clean.
Remove from oven and cool 10 mins. Invert onto plate and glaze while hot, allowing glaze to drip down sides.
**NOTES**
This is the original recipe, but I have found making the following changes makes mine turn out better:
- Be sure the oven is cold when you put your cake in to bake. No preheating is necessary.
- Don’t be tempted to over-stir the batter. Stir only enough to incorporate all ingredients.
- Over-stirring causes the cake to turn out with a bizarre spongy texture.
- Prepare pans with shortening and flour.
- You can use two loaf pans instead of a tube pan.
- Be sure ALL ingredients are at room temperature when you start- no exceptions.
- Don’t be tempted to soften the butter/cream cheese in the microwave- it will be too warm.
- If you use a glass or non-stick pan, the outside crust will be darker and a bit thicker. Aluminum or enamel-coated pans produce cakes with a light, golden brown crust.
- If you use a dark or glass pan, reduce the heat by 25 degrees and bake for 1 hour. Reduce heat again and bake for 30 mins. Check cake after 30 mins. If it’s not done, bake for 15 more mins and test again. Do this until the tester comes out clean.
- This cake dries out very easily if you over-bake it.
Alternate glaze recipe-
Use ½-1 t. vanilla instead of lemon juice to make a vanilla-flavored glaze. I’ve also tried orange flavoring with great results.

3 c. white sugar
3 sticks real butter (no substitutes)
1 8oz. package cream cheese
6 eggs
3-1/2 c. sifted all-purpose flour
1 t. real vanilla
Glaze:
1 c. powdered sugar
1 stick butter (softened)
¼-1/2 t. lemon juice (see notes for alternate recipe)
Cream together softened cream cheese, butter and sugar until light and fluffy. Add room-temperature eggs alternately with flour. Add vanilla last. Be careful not to over-stir!
Spoon into prepared tube pan. Place into a cold oven and bake at 350 for 1 hour. Reduce heat to 325 and bake 1 to 1-1/2 additional hours till tester comes out clean.
Remove from oven and cool 10 mins. Invert onto plate and glaze while hot, allowing glaze to drip down sides.
**NOTES**
This is the original recipe, but I have found making the following changes makes mine turn out better:
- Be sure the oven is cold when you put your cake in to bake. No preheating is necessary.
- Don’t be tempted to over-stir the batter. Stir only enough to incorporate all ingredients.
- Over-stirring causes the cake to turn out with a bizarre spongy texture.
- Prepare pans with shortening and flour.
- You can use two loaf pans instead of a tube pan.
- Be sure ALL ingredients are at room temperature when you start- no exceptions.
- Don’t be tempted to soften the butter/cream cheese in the microwave- it will be too warm.
- If you use a glass or non-stick pan, the outside crust will be darker and a bit thicker. Aluminum or enamel-coated pans produce cakes with a light, golden brown crust.
- If you use a dark or glass pan, reduce the heat by 25 degrees and bake for 1 hour. Reduce heat again and bake for 30 mins. Check cake after 30 mins. If it’s not done, bake for 15 more mins and test again. Do this until the tester comes out clean.
- This cake dries out very easily if you over-bake it.
Alternate glaze recipe-
Use ½-1 t. vanilla instead of lemon juice to make a vanilla-flavored glaze. I’ve also tried orange flavoring with great results.
September 9, 2011
Mama's Divinity

The following recipe is courtesy of my Mama.
3 c white sugar
½ c water
½ c light corn syrup
Place all ingredients into a heavy-bottomed pot with a handle. Stir all ingredients together initially, just to combine. Cook over medium heat until the syrup comes to 248 or hard-ball stage on a candy thermometer. Do not stir syrup while it’s cooking.
Additional ingredients:
2 egg whites
1 c chopped pecans
While the syrup cooks, beat two egg whites till stiff peaks form. Set aside until syrup reaches the correct temperature. Once the syrup is ready, turn on your mixer and begin pouring the syrup into the egg whites in a thin trickle. Be careful because the syrup will be extremely hot. Do not be tempted to pour it all at once because the mix will clump together. Once all the syrup is incorporated into the whites, continue to mix until candy starts to cool. Turn off the mixer and beat the candy by hand with a wooden spoon. Add nuts. Stir until the candy starts to hold shape and loses some of its gloss. Using two teaspoons quickly drop spoonfuls of candy onto a piece of parchment paper.
**Notes**
-A candy thermometer works best, but if you do not have one you can tell the candy is done by holding a teaspoonful of the syrup over the pot and watching to see if thin threads begin to “spin” off of the spoon.
-Also, you can check to see if the syrup is done by pouring a small amount into a cup of cold water. If it crackles and turns hard like a lollipop, it’s done.
-Stirring the syrup while it’s cooking will cause the candy to be hard and brittle.
-Using a stand-mixer is best, but you can also use a hand mixer if you’re very careful.
-Can use additional pecans if desired.
-It won't turn out if you make it on a rainy day.
One more note...
Making candy is becoming a lost art, unfortunately; and while I think you should try to make your own Divinity, I understand that life is busy. Seems like there are never enough hours in the day. Here is a link to the Savannah Candy Kitchen located in Savannah, Georgia. They sell Divinity, along with some of the best old-fashioned candy this side of the Mason-Dixon line. The Chocolate Gophers are to die for- trust me!
They also do mail order, just so ya know. ;)
September 7, 2011
Pumpkin Spice Latte Cupcakes

2 2/3 cups all-purpose flour
3 tbsp. espresso powder
2 tsp. baking soda
2 tsp. baking powder
1 tsp. ground cinnamon
1/8 tsp. grated nutmeg
1/8 tsp. ground cloves
1 tsp. salt
1 (15 oz.) can pumpkin puree
1 cup sugar
1 cup brown sugar
1 cup canola or vegetable oil
4 large eggs
½ cup coffee or espresso, for brushing
For the whipped cream:
2¼ cups heavy cream, chilled
¼ cup confectioners' sugar
For garnish:
Ground cinnamon
Caramel sauce
Directions:
To make the cupcakes, preheat the oven to 350°F. Line cupcake pans with paper liners. In a medium bowl, combine the flour, espresso powder, baking soda, baking powder, cinnamon, nutmeg, cloves and salt. Stir together and set aside. In the bowl of an electric mixer, blend together the pumpkin, granulated sugar, brown sugar and oil. Add the eggs one at a time, beating well after each addition. With the mixture on low speed, add the flour mixture in two additions, mixing just until incorporated.
Fill the cupcake liners about three-quarters full. Bake until the cupcakes are golden and a toothpick inserted into the center comes out clean, 18-20 minutes. Transfer the pans to a wire rack and let cool for 10 minutes, then remove the cupcakes from the pans. While the cupcakes are still warm, brush them two or three times with the coffee or espresso, allowing the first coat to soak in before repeating. Let cool completely.
To make the frosting, place the heavy cream in the bowl of an electric mixer fitted with the whisk attachment. Whip on medium-low speed at first, gradually increasing to high speed. Blend in the confectioners' sugar gradually. Whip until stiff peaks form, being careful not to over-beat. Use a pastry bag fitted with a decorative tip to frost the cooled cupcakes. Sprinkle with ground cinnamon and drizzle with caramel sauce. Store in an airtight container and refrigerate.
*Image and recipe courtesy of Annie's Eats.
Subscribe to:
Posts (Atom)